#Fit #Photos #Hair #Antique #Gold #Lockets #Locket #Care
.
Antique lockets and the internal fittings are hand made and so there is one very important thing to remember when removing the original internal frames and portrait protectors. If the locket is still fitted with the original frames and portrait protectors remove each one and place it on a piece of paper exactly the way it was placed in the locket.
This tip will save you time because you will not then have to keep trying which is the best fit.
Test the fit:
When the frames and clear portrait protectors fit well you will be able to pick up the locket holding it open with the interiors facing the floor and shake it gently. The internal features will not fall out because they were made especially for the piece. If they are not absolutely soundly in place you just need to refit them. Maybe replacing them in a slightly different way.
However, if you follow the advice in the first paragraph of this blog post you will avoid this problem.
How to open & close:
Solid gold lockets are formed around a gold frame which gives them added strength. Bearing this in mind we use the frame area or edges to open or close the locket. Most lockets will have a tiny area where you can insert a fingernail to open it. When you close the locket, shut it by pushing the two outer edges together, rather than closing it and then squeezing the middle of the locket until you feel the closure connect.
Moire:
If your locket is lined with moire and you wish to display it please be aware that moths like to eat / lay eggs on natural fibres. Displaying lockets lined with moire is best done in the closed position.
Attaching portraits or photographs:
You do not need a locket to be fitted with the original frames and clear portrait protectors to add a photo of your relative or partner.
Use a piece of tracing paper to draw the outline of the locket compartment. Then cut this out to use as a guide for what shape / size your photo should be. When you have a photo the correct size simply place a small square of double sided tape on the back of the photo and stick it in the locket compartment.
Double sided tape can also be used to stick photos on to moire as well.
Valuable antique miniature paintings should be fitted carefully by an experienced person and not taped inside.
Locks of hair / hair art:
Including a lock of hair in an antique locket has long been a traditional way to remember a loved one.
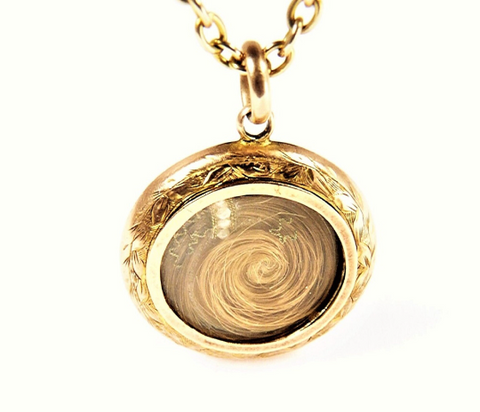
The splendid deep bodied fully hallmarked gold Edwardian mourning locket shown above was assayed* (tested for purity*) at Chester Assay Office in 1905. The front of the locket encases a beautiful lock of blonde hair which has been skillfully crafted into hair art embellished with tiny seed pearls. Pearls used in mourning jewellery symbolise tears for the dearly departed. The original protective cover and frame are present.
This simple design of a curled lock of hair is one of the most popular and easiest ways to present a lock of hair. On one side of the lock of hair appear to be tiny bits of string. The “string” is actually finely plaited hair.
It is a good idea to practise with some of your own hair if you lack confidence rather than use the lock of treasured hair. Then when you understand how to achieve the design you like best you can take some but not all of the treasured lock and prepare it to fit in the locket. Keep some of the hair in reserve.
Preparing the hair:
Traditionally the hair would be cleaned prior to styling.
If you would like to read about how professional hair artists in the Victorian era created hair art we have included extracts and illustrations from The Lock of Hair by Alexanna Speight which was published in the late Victorian era.
For most people the fact that the hair belonged to someone they miss so much is the most important aspect of the inclusion of it in a keepsake locket. A simple design is just as pleasing as the most elaborate hair art.
Only a tiny amount of hair is needed to create a simple lock design or the most elaborate hair art.
How do you secure the hair in a locket?
The easiest way to do this is to wrap cotton thread around one end of the lock of hair. Then tie a slender piece of ribbon around the sealed end. Glue the back of the ribbon and hold this firmly inside the locket to form a bond.
The traditional way to glue a lock of hair in place is to use gum Arabic.
This product can be purchased from most online craft stores.
It is not necessary to have the original frames and clear portrait protectors to keep the lock of hair in place because it is now glued into the recess and lockets are worn closed.
Hair Art:
We wanted to find expert instruction for all of those of you who wish to learn about or practice hair art. Who better than Alexanna Speight to explain how to make wonderful hair art creations. These extracts and illustrations are taken from the book listed below which was published in 1871.
We have concentrated on the practical aspects of this art, rather than the history of it which is also detailed in the book. The extracts begin at page 86.
THE LOCK OF HAIR
ITS HISTORY, ANCIENT AND MODERN
NATURAL AND ARTISTIC
WITH THE ART OF WORKING IN HAIR
BY
ALEXANNA SPEIGHT
CLEANSING THE HAIR
Having now fairly started on our task, the first thing the young artist has to learn is that the lock he or she (we will say she, we like the expression so much) has to fashion must be absolutely free from all impurities. It may seem to be a sort of treason to the adorable or adored one who bore the silken tress to hint that, in its natural state, the hair is not so.
However dark, or fair, or beautiful the hair may be, it has made the acquaintance of oil and dirt in some form or other, and that oil and dirt must be carefully removed before it is to take its place among the fine arts. Once you admit the presence of oil and impurity their removal is an easy matter. All you have to do is, take, say about half a teacup full of hot water, and dissolve in it two small pieces of borax and soda, each about the size of a nut.
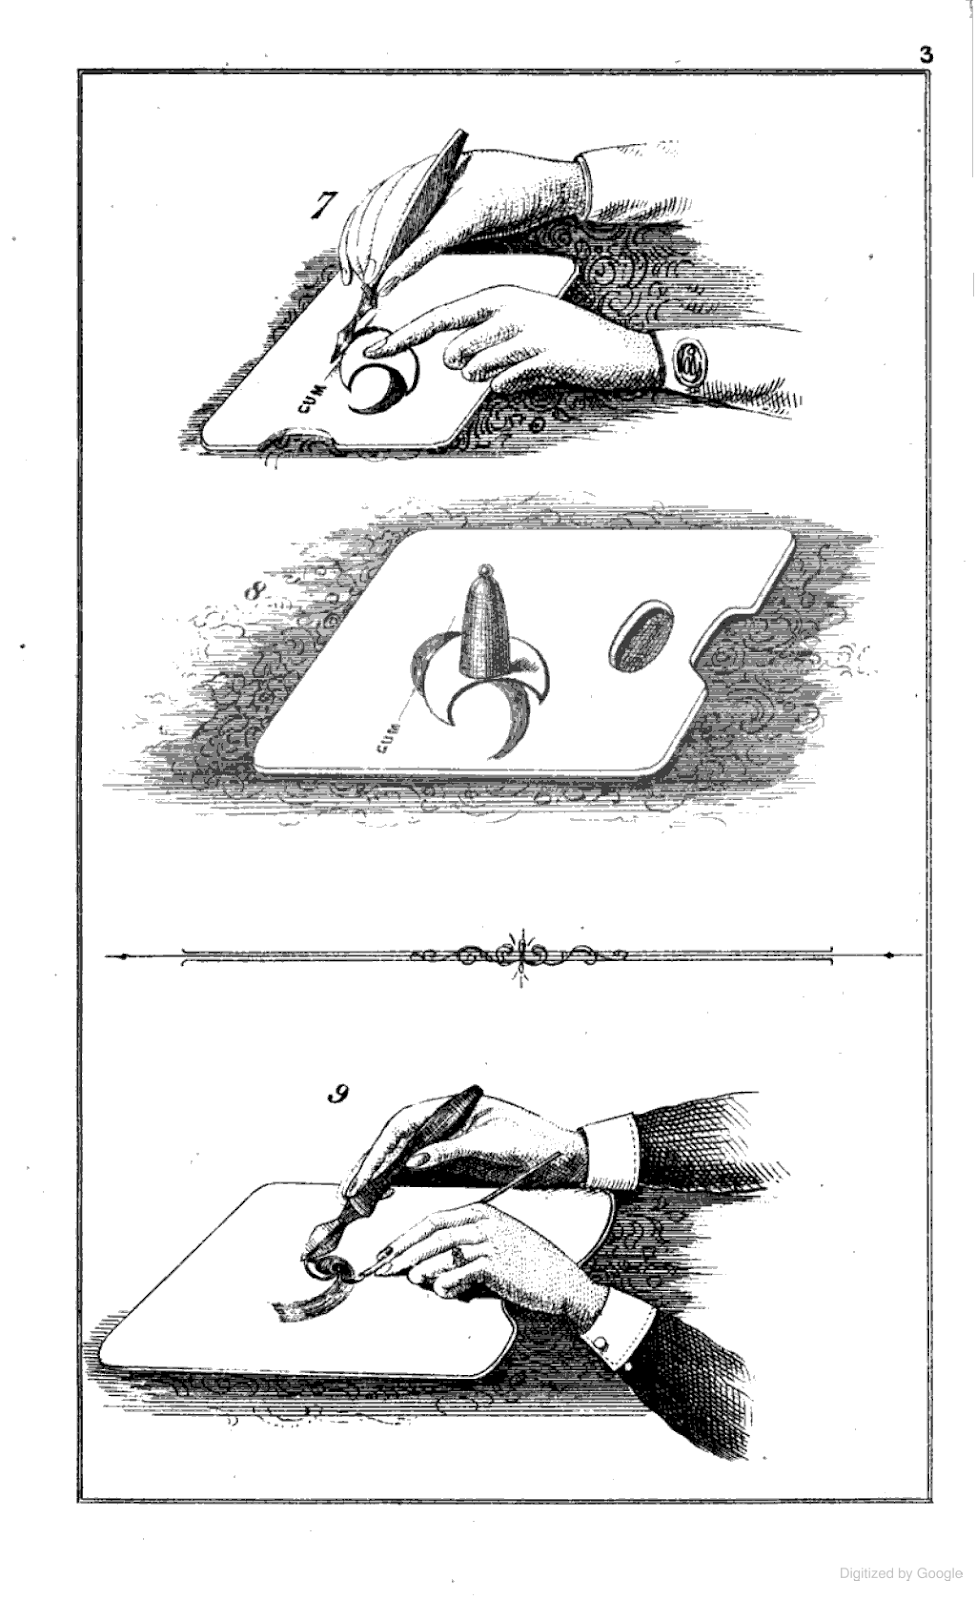
Into this preparation put the lock of hair, and having left it in the water for about a minute or two, take it out, and carefully spread it on the palette. Having spread the hair carefully out with one hand, h9old it firmly to you, and with the other scrape it carefully down from you with the edge of the knife, until you have entirely removed every particle of any sort of impurity.
The manner in which the hair is spread out on the palette, held and scraped, can be more readily seen if the reader will refer to diagram No. 1 of the illustrations.
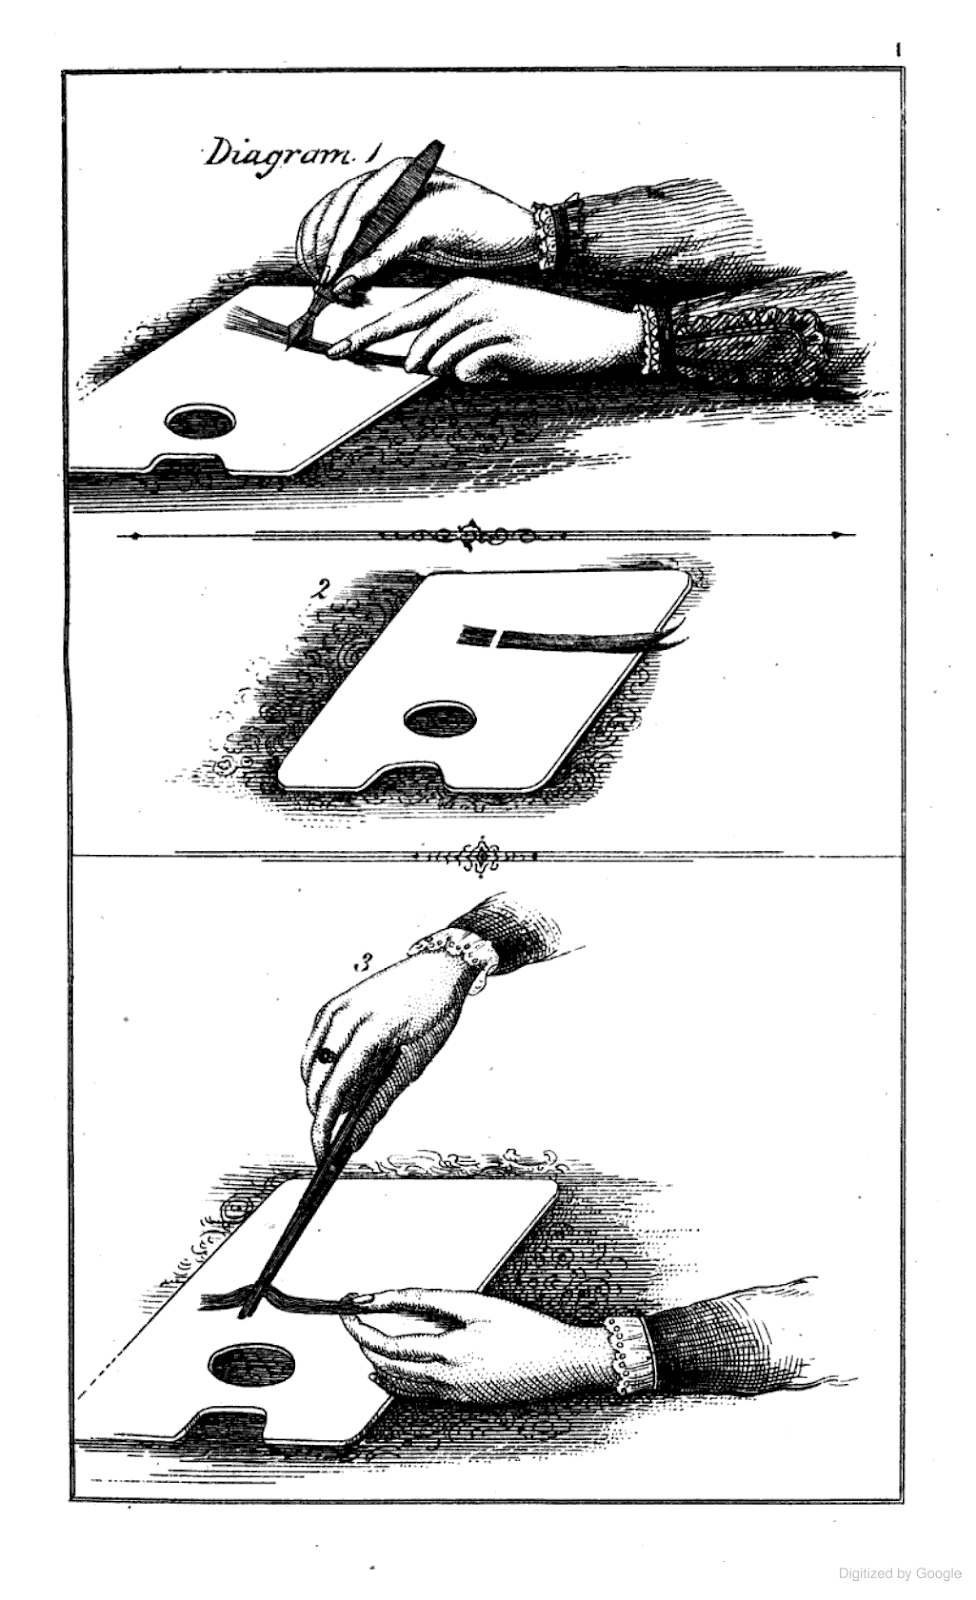
Having carefully scraped the hair, then take about half a teacup full of water, dissolve in it about the same quantity of borax as that used on the first occasion, and in this solution rinse the hair, which will then be ready for the next step in the process. Before going further you must take care to have the palette carefully cleaned, and free from any grease that may have been attached to it by the last process. Having seen that this is done the hair should be spread down evenly on the palette with the edge of the knife, and the uneven or jagged ends cut off. How this is done will be readily seen by reference to No. 2 of the diagrams. The hair having been now cleansed, spread out, and trimmed, is ready for the more delicate manipulations which follow.
The next step takes us into the midst of the art or mystery of hair-working, and here we may perhaps be permitted a word or two of gentle monition, it is that each of our little processes should be carefully mastered before the next in succession is attempted. This will lead both to perfection and peace of mind, both admittedly not undesirable results. If after this little lecture, the fair and gentle reader will turn to diagram No. 17 (oddly coinciding, we have little doubt, with the number of her own tender summers), she will find a well known and justly-admired design called the Prince of Wales’ feather.
Now we mean, with the help of your own sweet intelligence, dear young lady, to point out to you the way in which you may produce that and other designs, even prettier than this is.
PRINCE OF WALES’ FEATHER
It will be seen that the feather is made up almost entirely of three curls, exactly similar in form. We propose first to show how the curl is produced, and then how the final result, the feather, is attained.
HOW TO MAKE THE CURL.
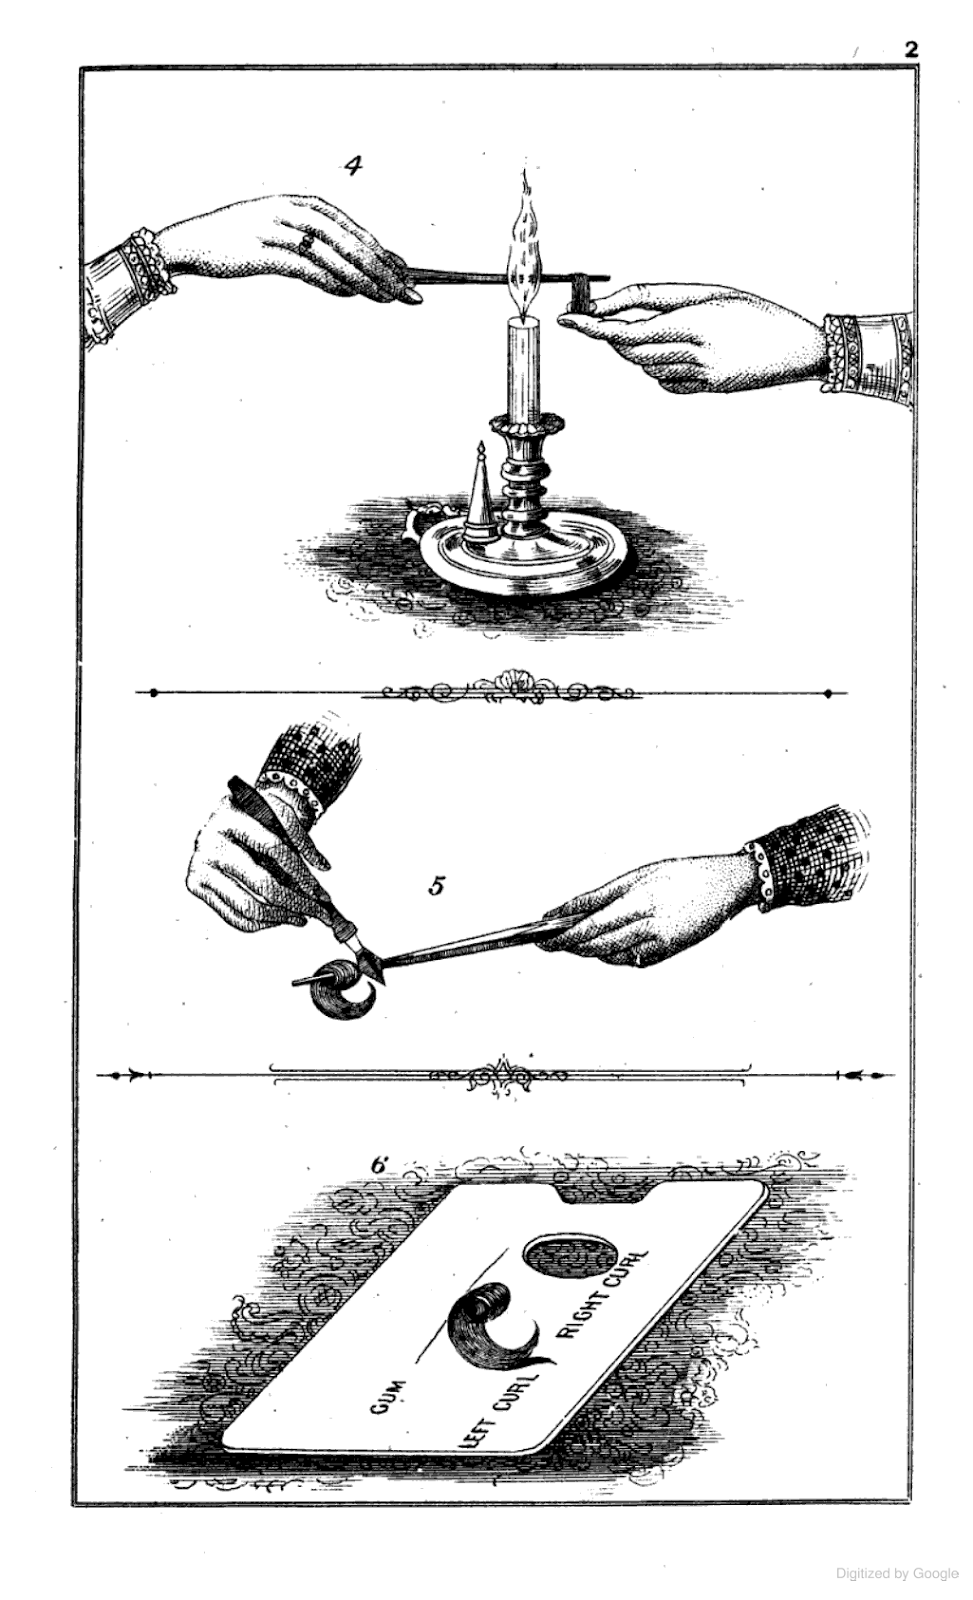
Take the curling-irons in your right hand, holding the hollow or scooped side downwards. With the left lightly raise the end of the hair, which you will observe by looking at diagram No. 2, ought to hang slightly over the edge of the pallette. That done, put the hair in the irons, and carefully pass them down, until you get to the trimmed end, as in figure 3. Now close the irons as carefully as you can, and turn them round towards yourself three times.
You will remember that all this time you must hold the end of the hair carefully in your left hand, keeping it gently stretched round the irons. Then place the irons either in the flame of a candle, or over a spirit-lamp, at a point about half way between the handle and the hair, but at such a distance from the hair as to prevent its being injured by the flame, and hold the irons in this position until they become so heated as to cause the hair to steam.
Then remove the irons from the flame to cool. A glance at diagram No. 5 will show how this is done. There is one matter in which you cannot be too careful, and that is to hold the end so firmly and steadily with the left hand that a strong curl may be obtained. Having obtained the curl the next step is to remove it from the irons. This is a comparatively easy matter, if carefully managed. First pass the irons from the right hand to the left, there is no difficulty in this, for the curl being now set, you need no longer hold the end between your fingers.
Then wet your finger and thumb with your lips, and moisten the end of the curl with your finger and thumb, so as to prevent the hairs spreading out, then slightly open the irons, and with the knife gently scrape off the curl on the pallette, as shown in diagram No. 5.
The next process is to fix both the ends and twist of the curl by means of a little gum. With a camel-hair pencil lay upon the pallette a fine line of gum: then lift the curl with the point of the pencil, place the head of the curl on the gum line, leaving the loose end free. Then take a finely-pointed needle, dip it slightly in the gum, pass it lightly through the eye or centre of the curl, keep the curl steadily on the pallette by means of the fore-finger, and whilst you withdraw the needle press it gently, so that the needle may leave a small quantity of gum inside the curl.
Diagram No. 6 will help you to understand the position of the gum-line and curl on the pallette.
Having now made your curl, and gummed it, the next thing is to secure the result of your labours. As soon as the needle has been withdrawn firmly press the curl on the pallette with the ivory counter, as seen in diagram 7. Then place upon it the sugar loaf weight, as seen in figure 8, and leave it so for about an hour, at the end of which time the curl will have been sufficiently set.
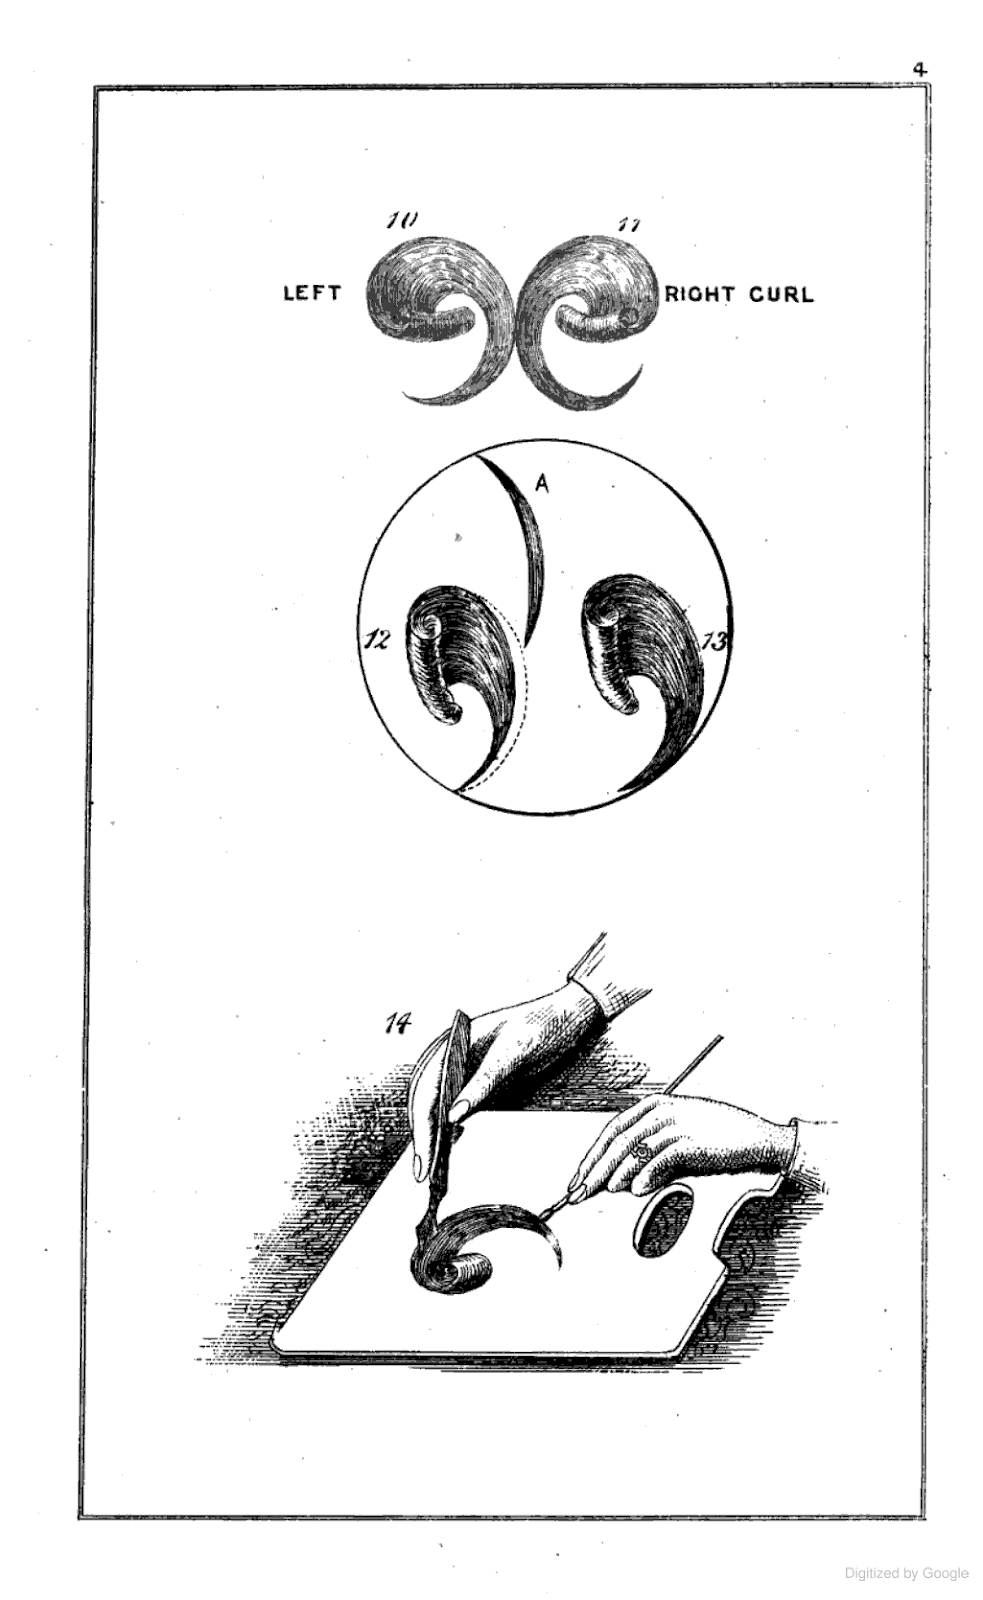
If you look again at the Prince of Wales’ feather on figure 17, you will not fail to observe that one curl turns towards the left, and two to the right, so that in fact you must have right and left curls. This is easily managed, and depends entirely upon which side you insert the gummed needle. For a right curl the needle has to be inserted on the left side, and for a left curl on the right side.
FINISHING OFF THE CURL.
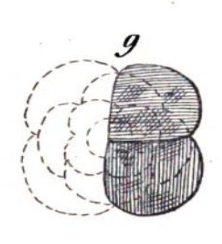
The curl having been made and set in the way we have described, and left under the sugar-loaf weight for an hour, may be finished off. The loose end of the curl is to be freed from any dried particles of gum that may be attached to it, by slightly damping it with the pencil dipped in water, and lightly scraping away the gum the knife. The loose end having been thus cleansed, should be moistened by the pencil dipped in a weak solution of gum, and the hairs above the curl lightly spread out with the knife, taking a few hairs at a time, and brought round as shown in diagram 9, so as to form figures similar to those seen in diagrams 10 and 11. This done the curl should be slightly moistened with a weak solution of gum, and left to dry in the desired shape.
Now it is just possible that the hair you are anxious to preserve is too short to form a curl of the dimensions shown in the diagrams. In that case we must endeavour to find you a way out of the difficulty, and we think you will see one if you refer to the 12th figure. There you will observe that a deficiency arising from the cause we have mentioned has to be made up. You simply lengthen the curl by adding a tail to it; the dotted lines on figure 12 show you how the tail is attached, and figure 13 represents the completed curl. The curl now has to be removed from the palette. To do this you warm the pallette by it on the hob, or before the fire, for a few minutes, and you will soon find that the curl becomes loose, and may be lifted off with the edge of the knife, ready for either the ivory tablet or opal, in connection with which it must next receive our attention.
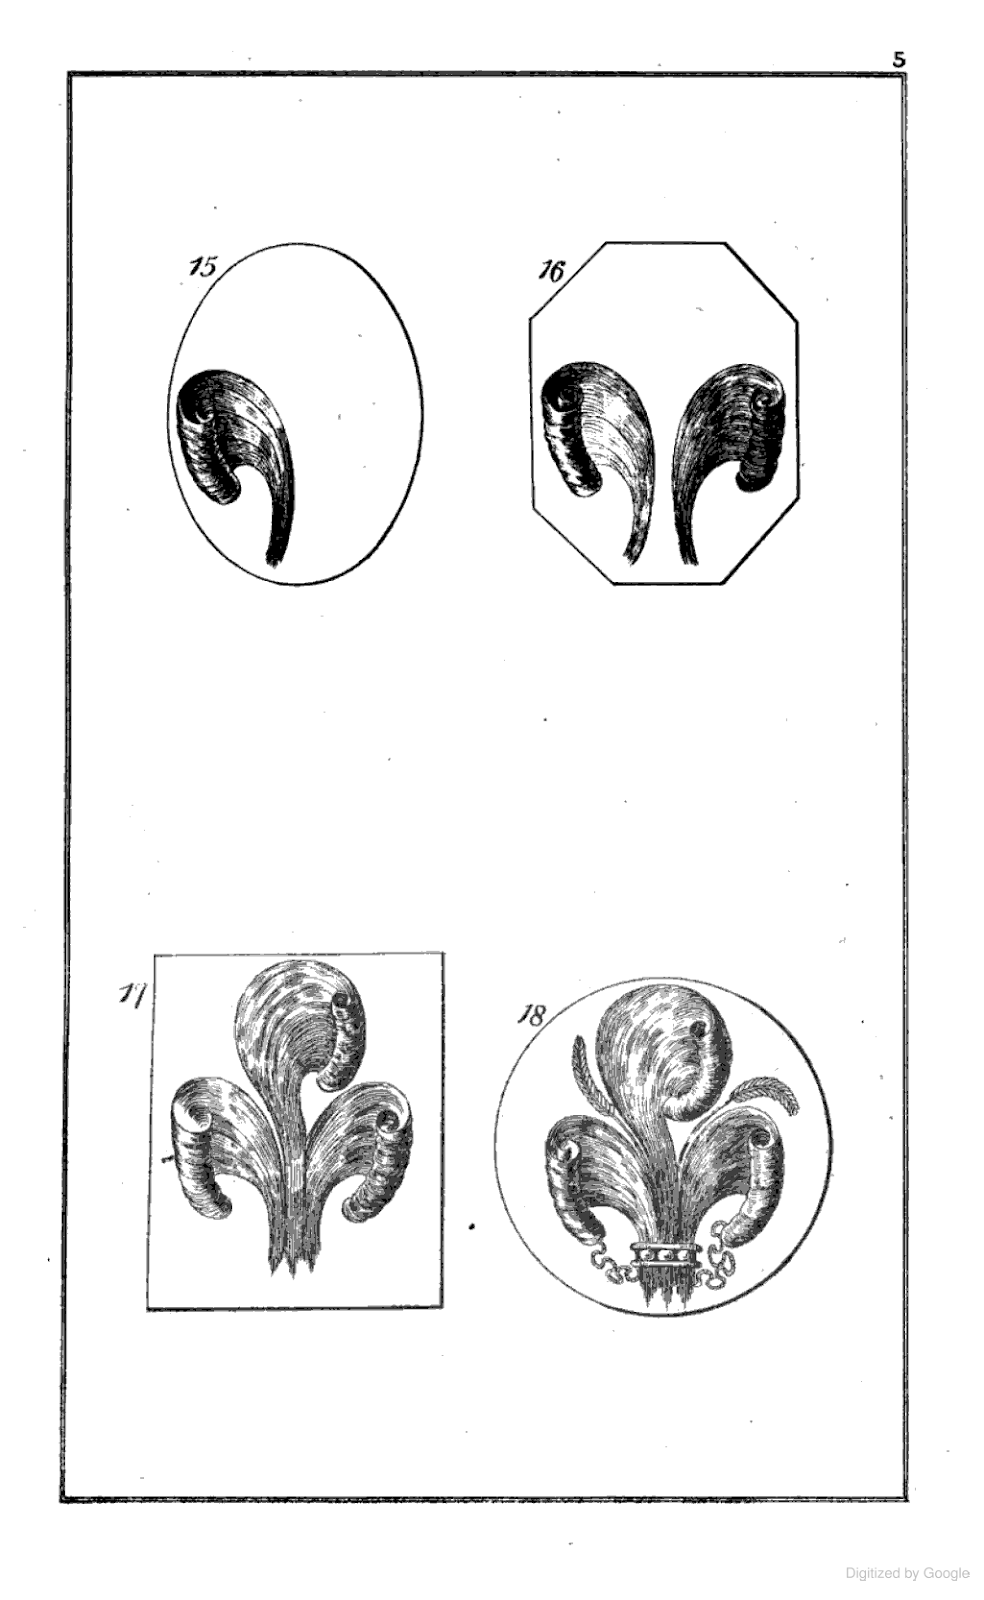
The next step in the process is to transfer the curls to the tablet, fix them there, and add a few finishing touches for the purpose of giving elegance and lightness to the whole. Having got a tablet of the size and shape you desire, gum it upon a piece of white writing paper; then take the three curls, one left and two right hand ones, or visa versa, according to taste slightly damp the back of each curl with gum, and place them on the tablet, as seen in figures 14,15, and 16.

As far as the hair portion of the design is concerned your labours now have ceased, but as you will observe upon looking at figure 17, there is yet much to be done in the way of finish before the production can meet open criticism. You will observe between the curls two golden ears of barley, and at the bottom of the design a little filagree work and three pearls.
We now propose to show you how these are to be prepared and attached, and although the work looks difficult, and does require some nicety in its manipulation, you must not be disheartened, for the task, after all, is one to be learnt with comparative ease. Having provided yourself with a reel of gold wire thread, wind off about eighteen inches, and divide this into three or more pieces of equal length. Now turn to figure 18, and you will see at the points A and B two small hooks.
THE PEARL BAND
If you will now take the trouble to turn to figures 25,26, and 27, of the diagrams, you will see the different stages of the bands. First get a piece of white writing paper, cut it into shapes seen on figure 25, and of the proper size. This piece of paper forms the ground work of the band, and should be gummed upon the lower part of the hair, where the three curls join into one stem. You readily see where this little piece of paper has to be placed, by turning to figure 17. Having affixed the piece of paper, take gold cord, curve it slightly in the same way you did the barley stalk, and divide it into three pieces, each a little longer than the band. Dip these pieces so prepared into the gum, and place two of them at the top of the band, and one at the bottom, as seen in figure 26.
Now you have to add the three pearls, and having done that you will be very near the end of your labours. Take the pearls and split them in halves, by pressing a pin through the hole in the pearl. Dip the pieces of pearl into the gum, and place them one at each end of the band, and one in the centre. By the way it will add considerably to the appearance of the design if you have the half pearl for the centre a little larger than the other two.
But one thing more, and we have done, If you look at figure 17 you will observe a little gold filagree work connecting the ends of the two outside curls with the band. Take two pieces of the gold cord twisted into the form of the coils, seen on figures 18 or 19, according to your fancy, dip them in the gum, and place them on the device, in the position indicated on figure 17.
A little more and we really have done, and the lesson learnt. Take a little spirits of wine, and by means of the camel-hair pencil slightly damp the design, and with the knife remove and superfluous gum you may see.
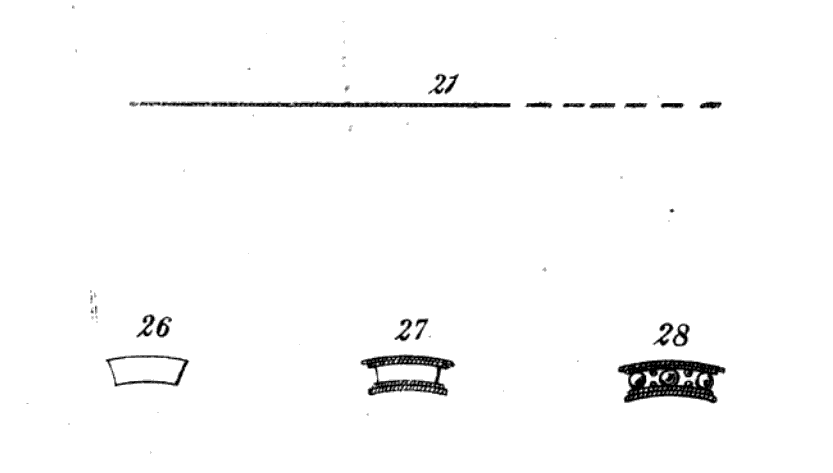
DIAGRAM OF THE PEARL BAND
THE FEATHER.
To form the device called the feather, which is to be seen in all its luxuriance…we must begin with the cleansing…the first step in the process is the formation of the stem of the feather. To do this take a small quantity of the hair, moisten it well with a solution of gum, place it on the tablet, and then by means of the knife press it into the form seen on figure 32…As soon as the stem has become dry, then get some more hair and cut it into little pieces of about a quarter of an inch in length, or it may be a little more or a little less…these little pieces of hair which are to form as it were the fringe of the feather, must be in due proportion to the stalk. These little pieces of hair…have to be thoroughly saturated in the solution of gum. As soon as this is done place them along the stem by means of the knife, beginning about half an inch from the bottom.
HOW TO MAKE A HAIR ART FEATHER
Our notes:
Gold-beaters’ skin is the processed outer membrane of the intestines of an animal, usually cattle. This highly durable membrane is valued for its strength against tearing when used in the traditional way of making gold leaf. Layers were interleaved between sheets of gold stock during the process of making gold leaf by goldbeating.
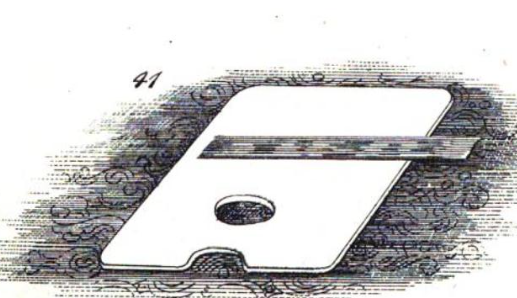
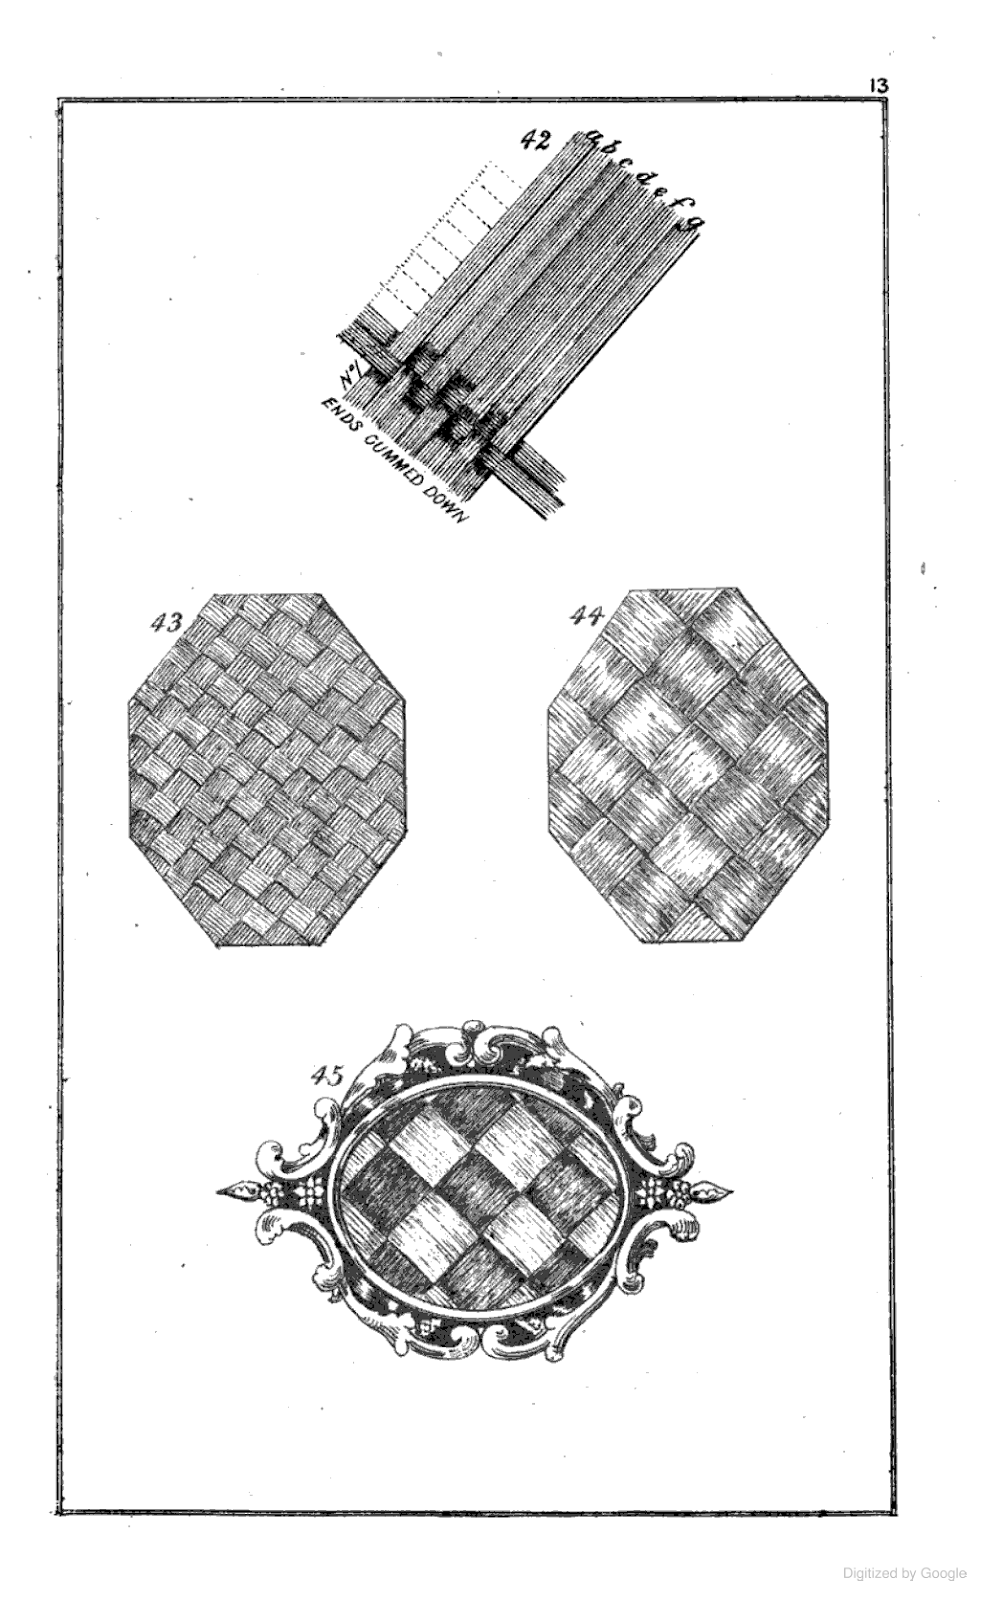
THE BASKET PLAIT.
This is the simplest design, and certainly the easiest of execution…Take the prepared slips of hair-covered gold-beater’s skin and cut them into smaller slips, of the dimensions you think are suitable. Then take a certain number, say seven of the strips, and with some strong fum attach the left ends of the strips to a sheet of writing paper, leaving the other or right ends free,a s seen in figure 41. Then leave the strips until the gum has become dry, and they have become firmly attached to the writing paper. As soon as they are ready you proceed to make the plait…
HAIR ART BASKET PLAIT
THE FORMATION OF FLOWERS.
FLOWER FORM TABLET (TEMPLATE)
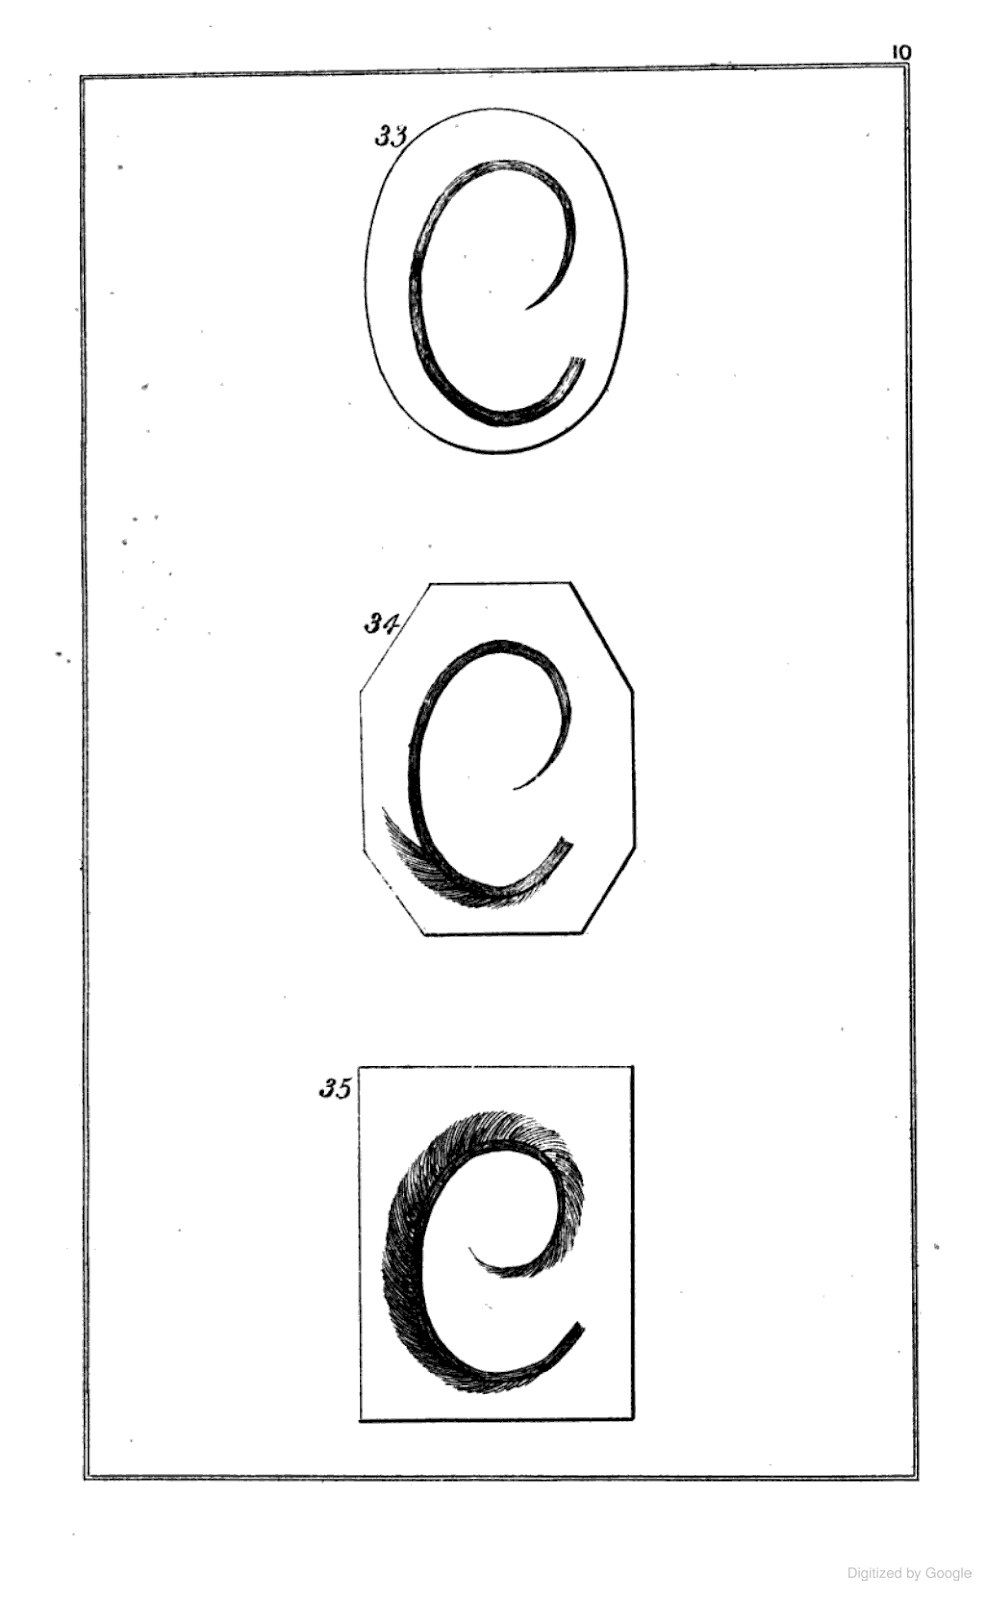
…the artist has to select a tablet (template) of the desired shape, and to fix it with gum upon a piece of writing paper…Then fix the gummed hair upon the tablet in the curved shape shown in the figure.
Browse our fully hallmarked antique gold locket collection.


